Tuesday, February 3, 2015

Mail Order Fiddle Leaf Fig

I may be the last decorator in America to get on the Fiddle Leaf Fig Tree train! I have searched high and low for years and could not find one. I looked at every big box store and even at high end garden centers to no avail. Then one day as I was reading the Copy Cat Chic blog, there was a copy cat room that included a Fiddle Leaf Fig tree and there was a link for a tree by mail order from none other than Home Depot!!!! It was less than $20 so I decided to take a chance. I am so glad that I did.

fig tree on porch in summer a

It has done very well.

fiddle leaf fig tree delivery a

It was very well packed when it arrived at my door.

fiddle leaf fig tree delivery b

fiddle leaf fig tree delivery c

The new plant was probably 18 to 20 inches tall above the soil line.

fiddle leaf fig care tag a

fiddle leaf fig care tag b

unpacking the fiddle leaf fig

It has been easy to care for. I keep I on the dry side as opposed to over watering. I have left it on the porch for 2 weeks while we were on vacation in the middle of summer and it did fine.

new fiddle leaf fig

I sat the pot inside a $10 Walmart olive bucket.

fig tree 8-14 a

The photo above was taken a year later.

fig tree on porch in summer b

IMG_8096fig tree 8-14 b

You can see from the comparison shot above how much it grew in one year.

fiddle leaf fig tree winter b

During the winter months, it stays next to the fireplace in our sun room.

fiddle leaf fig tree winter a

It is doing very well in this spot too.

fiddle leaf fig tree w yardstick

I took one picture next to a yardstick just for reference. I don’t know that I have ever ordered a plant online before but I have been more than happy with this purchase.

a signature

I’m linking to Wow Us Wednesday at Savvy Southern Style and to Grace at Home at Imparting Grace.

Tuesday, January 27, 2015

How to Customize an Old Refrigerator

When we built our summer cottage six years ago a friend gave us this refrigerator for our basement. You can click here to see how I reversed the opening of the door. While my first preference was a stainless refrigerator, I couldn’t see spending money when we had a working refrigerator so I have been pining over how to update it. I finally decided to add wood panels to help it blend in with the cabinetry.

finished panels on refrigerator

I purchased two sheets of 1/4” plywood and used some scraps to cut the panels and trim.

Kreg Rip Cut

I used a carpenter’s square to mark the cutting lines for my panels after I had carefully measured each side. I also cut strips of wood to cover the outside edges of the doors so I cut the front panels big enough to include covering the sides of the doors. To make that clear, I added 1/2” to the width of the panel for the front of the door to cover the 1/4” panels on the sides of the door and I added 1/4” to the height of the door panel to cover the panel at the top edge. I didn’t cut a panel for the bottom of the door since it will never be seen. I used the Kreg Rip Cut tool for cutting the panels.
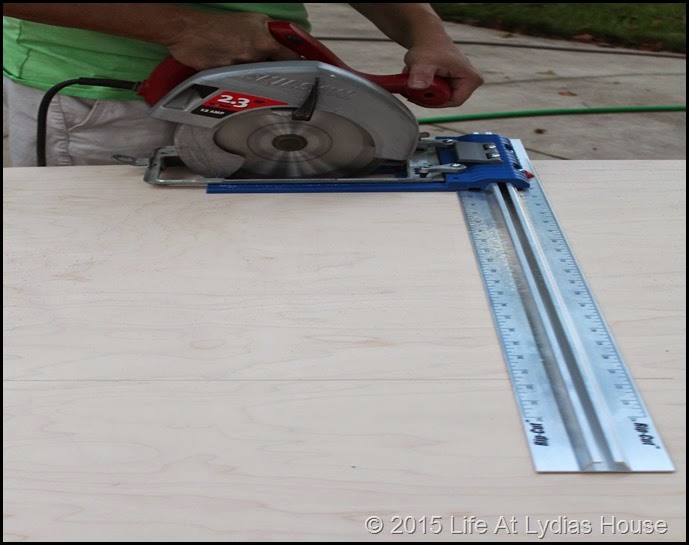
Using the Kreg Rip Cut 2

The Kreg Rip Cut is an attachment for a circular saw which helps make straight long cuts that would otherwise require a table saw. I can’t say enough about how much I loved using this tool!
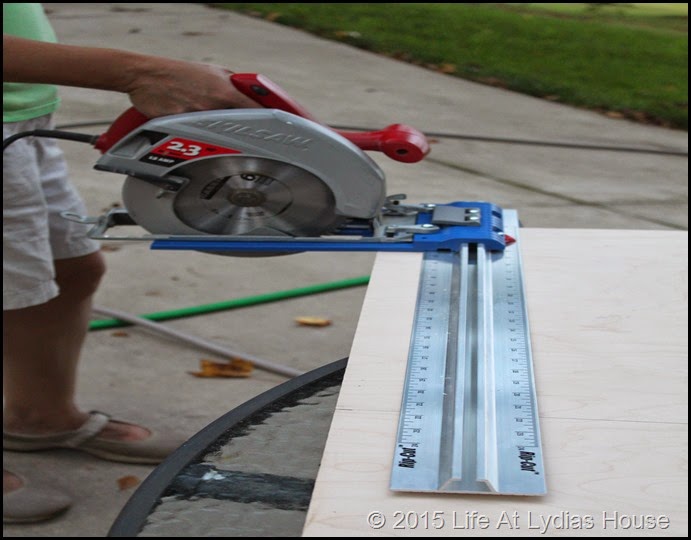
using the Kreg Rip Cut

The photo above is just for demonstration purposes. The saw is not operating as I would NEVER operate a circular saw with one hand. Safe operation requires TWO hands on the saw at all times. Material should be clamped in place so that you can keep both hands on the saw at ALL times. (My brother lost his thumb holding material with one hand and making a quick cut with the other!)

another view of the Kreg Rip Cut

This photo is a better view of operation of the Rip Cut.

attaching trim strips to wood panels

After cutting the panels and trim strips, I used wood glue and clamps to attach the trim to the edges of the panels giving the look of Shaker cabinet panels. You can see in the photo above that the strip to the right is lighter in color than the other strips. It was cut from a different piece of wood. If you were staining this project you would not want to use this because it would look different on the finished project. Since I was painting the wood, it didn’t matter that it was a different color.
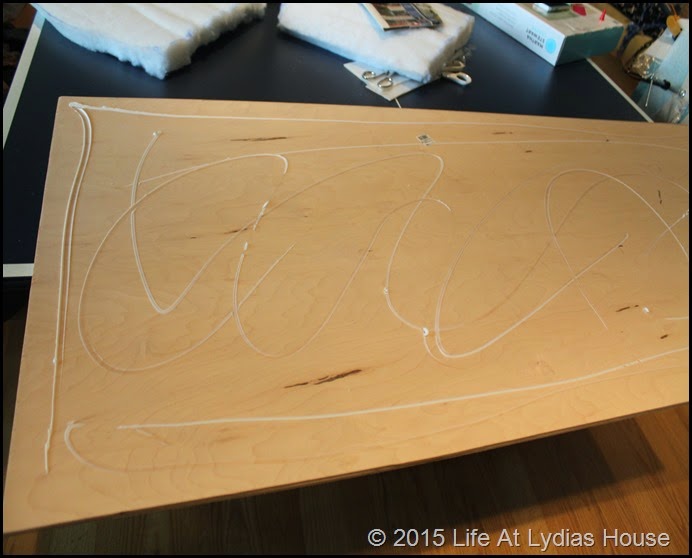
applying construction adhesive

After the trim was dry, I applied a generous amount of construction adhesive to the back of the panel.

panel ready to mount

This panel is ready to stick to the side of the refrigerator.

using clamps and straps to hold the panel in place

Because the panel is so tall, I used 4’ furniture clamps at the top and bottom and straps around the middle to hold the panel in place until the adhesive dried.

clamps and straps view 2

I repeated that process for all sides of the refrigerator.

ready to paint

ready to paint closer view

Now it is ready for the paint finish. If you look closely at the photo above, you can see the panels on the sides of the doors that I was referring to earlier.

coat one- white paint

I started with my base coat of white paint.

glazing process

Then I added my glaze coat of stain. I always use Minwax dark walnut. I apply a quick coat then wipe it off.
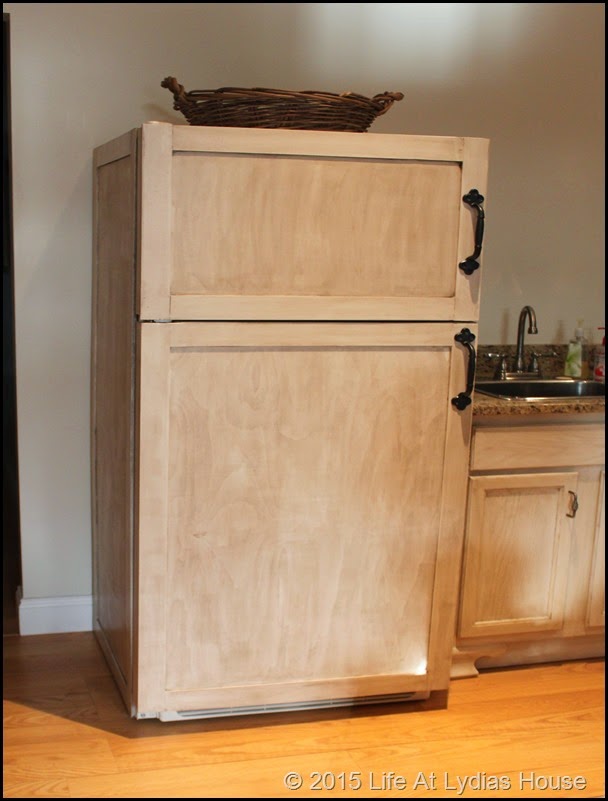
hardware attached

I didn’t want to use the same old handles so I had to look high and low to find something that I could use. I found these old pulls at Round Top for $5 each. The challenge was finding pulls that were screwed on from the outside. These fit the bill and worked very nicely. Now, let’s take a look at the before and after.
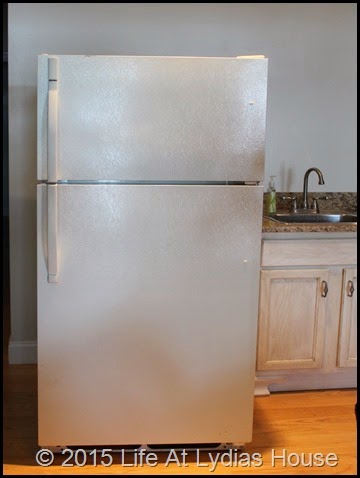
refrigerator beforefinished panels on refrigerator

I like the after much better even though the photos don’t do it justice. If I open the curtains in that room while taking photos the sunlight and glare is overwhelming and if I leave them closed everything looks dark and gloomy. I would rather work on projects than learn how to take good photos!

I hope you have had a great January! I can’t believe it’s almost over!

I’ll be linking to Wow us Wednesday at Savvy Southern Style and to Grace At Home at Imparting Grace.

a signature

FYI- I recently read a blog post regarding giving more information and not assuming that our readers know all of the ins and outs of our blog so here goes. If you click on any text that is in a different color on this page you will be taken to another page or “link” with more information on the given topic!

Tuesday, January 20, 2015

Repurposed Chicken Coop Table

When I was staging my niece's house to sell I needed to find a budget friendly table for the entry. When I came across a chicken coop at one of my favorite second hand stores, I knew that it would make a great entry table by standing it on one end.

chicken coop table 1

Why does it work?

It protrudes from the wall less than 12 inches.

It is the perfect height.

It provides visual interest.

It adds texture to the room.

It is very unique.

I love that the little door with the spring still works.

entry after

The price was right at $28 and I was able to get a piece of glass cut to fit the top for about $10. I used a mirror and lamp that I already had and added one of my wooden cigar boxes and a small vase of blooms clipped from the yard. It was quick, easy, and inexpensive. You just can’t beat instant gratification.

entry after (2)

I was very pleased with how it turned out.

a signature

I will be linking to Wow Us Wednesday at Savvy Southern Style and to Metamorphosis Monday at Between Naps on the Porch.

Tuesday, January 13, 2015

Another Lamp Project

I love pretty lamps. I love it even more when they are not expensive!  I have a nice copy cat lamp project to share with you today.

copy cat pagoda lamp

Let me show you my inspiration.

inspiration lamp $495

I saw the lamp pictured above at one of my favorite browsing shops. It is by Dana Gibson and the price was $495! I decided that I could use this one as inspiration to make my own.

ginger jar lamps

I ran across these two lamps at a second hand store. The bright yellow one was $6 and the white one was $15. They are identical in shape and size. When I asked the clerk about the price difference she told me that they don’t sell very many bright yellow lamps so it was cheaper and would not budge on the price. I bought them since $21 for two lamps is still a great price.  Even though one was already white, I taped off the electrical parts and gave both of them a coat of white spray paint. I have to remind myself that several very light coats of spray paint are more effective than one heavy coat.

lamps painted with base coat

Next I found some clip art pagoda images online and printed them and cut them out. I also cut out my outline shapes to use. I decided on the placement for the pagodas, taped them to the lamps, and traced around them with pencil.

pagoda images found online

pagoda tracings

I pulled a couple of colors from the comforter fabric in the room where I was planning to use these lamps and had sample size jars of paint mixed in those colors.

filling in the big areas

I started the painting by filling in the big areas.

pencil eraser dots

I filled in with various lines and dots. I used a pencil eraser to make the dots. I was not going for perfection here so slightly wavy lines and many other imperfections did not cause stress.

lamp with white shade

I added white shades and used some Asian finials from some lamps that I no longer use. After living with them for a couple of weeks I decided to add a stripe to the shades. Adding ribbon to the shades was not an option because of the shape of the shades.

finished lamps

The shades were about $20 each and the paint was $6 total so my total cost was $67 for two lamps. If I had purchased the two in the store it would have cost $1049.40 including tax. I just saved myself $982!  I LOVE it when a plan comes together!

a signature

I’ll be sharing with Wow Us Wednesday at Savvy Southern Style, to Grace at Home at Imparting Grace, to Metamorphosis Monday at Between Naps on the Porch, and to Best of the Nest at Simple Details.

Sunday, December 28, 2014

2014 Project Review

It’s been a while since I have posted due to an extremely busy month of December. As some of you know, I have a small business Bethlehem Christmas Dinnerware, as well as several Christmas decorating jobs. Throw in decorating the house, hosting a party, baking 48 cakes, attending a few Christmas functions, doing a little shopping, wrapping gifts and a birthday trip and it’s pretty obvious why I haven’t had time to do a blog post! So many times I don’t feel like I have accomplished much until I review my blog posts. This online project diary helps me feel much more productive. I had a very busy year! My biggest project for 2014 was planning and taking a trip to Europe with my daughter. We had such a wonderful time and look forward to going back again some day.

Keukenhof Gardens 8

You can click here, here,here, here, here, here, and here to read about our trip. I actually spent a lot of time traveling this past year. I spent about nine weeks in hotels!

Zapp Hall in Warrenton

I was also able to get to the Round Top Antiques festival. You can read about that trip by clicking here and here. You can read about my birthday trip to New York by clicking here.

While at home, I did manage to complete a few projects.

blanket chest from piano parts

I used pieces of my grandmother’s upright piano that I had deconstructed to build this blanket chest.

refrigerator cabinet pantry 1-16

I built a slide out pantry on the sides of my refrigerator using the existing cabinetry. This is a great use of otherwise wasted space. You can read about that project by clicking here.

I made some lamps from various objects. You can read about them by clicking here and here.

parrot lamps with blu and green shade

new shade- close up

I completed several chair projects. I converted this one to a swivel rocker for a friend’s nursery.

Converted Rocker 1

I did a total makeover on these.

PicMonkey Collage red chairs

I rescued this one from Goodwill.

new home for old chair 2

You can see how I staged my niece’s house to sell by clicking here.

I also helped my daughter build corn hole boards for some fall fun.

finished at last

I also managed to do a little shopping. You can click here, here, here, and here to see some of my finds.

collected tablescape 1

I have some long overdue projects planned for 2015 if I can just pull them off! I hope that each of you had the most wonderful Christmas ever and wish you the very best New Year! Thank you for every visit and especially for taking time to leave a comment!

a signature

I’ll be linking to Southern Hospitality and to Between Naps on the Porch. Click the link to see lots of inspiration.