Sunday, October 28, 2012

Fresh Apple Black Walnut Cake

It’s that time of year again. Fall is in the air and it is apple season. I had a call from my daughter who was coming home this weekend requesting an apple cake, if I had time to bake it. Of course, I obliged. Fresh apple with black walnut pound cake is a family favorite. We even eat it for breakfast! This is a heavy batter and you will need a heavy duty mixer. (My personal preference is my Kitchen Aid. I consider it a must-have for anyone who bakes.)

IMG_1657_thumb5

The recipe is :

2 cups sugar

1 1/2 cups oil

3 eggs

Beat the first 3 ingredients well, then add:

3 cups sifted flour

1 tsp salt

1 tsp baking soda

Next stir in

3 cups diced apples

1 cup black walnuts

1 cup coconut

2 tsp vanilla

Stir well and pour into a greased tube or bundt pan. Bake at 350 for 1 hour and 20 minutes.

IMG_1661_thumb11

I hope that you try this recipe and love it as much as my family does.

signatureandsidebar003-001-1_thumb

I’ll be linking to Metamorphosis Monday at Between Naps on the Porch and to On the Menu Monday at StoneGable.

Monday, October 15, 2012

Another Update with a Lampshade Slipcover

You may remember my slipcovered lampshade on my entry table from this post. It sits on the table that I made from parts of my grandmother’s piano. If you missed that post, you can read about it here.

table from piano parts

After living with that for a few months, I decided that I needed a little color so I made another slipcover for the lampshade using leftover silk from the window treatments.

slipcovered entry table lamp 1A

As you can see, this table sits in a little niche right next to the refrigerator. The new shade slipcover is close to the color of the walls.

slipcovered entry table lamp 1B

The niche is at the end of our narrow entry hall. In addition to switching out the shade, I also moved the antique cigar box. I love the wooden box, but opening and closing the lid was not working. I switched to a decoupage plate for dropping keys.

decopage plate 1

Here’s a better shot of the plate.

decopage plate 3

The new arrangement works better for us as a quick place to drop our keys and charge our phones. As a side note, the flowers are from a $4.99 grocery store bouquet and are 3 weeks old! That’s a lot of bang for $4.99!

Also, I’ll be linking to Wow Us Wednesday at Savvy Southern Style.

Also, if you missed my last post,  I want to remind you that there is a GREAT sale going on at LydiasHouse.com on Bethlehem Christmas dinnerware because I just learned that we will have to move our warehouse by the end of the month!!! Click on this link to go directly to the products page.

IMG_1718

Please help me get the word out. The prices are our lowest ever because I would rather sell at a deep discount than move the inventory. Also, please pray that we will be able to find affordable warehouse space!

Have a great week!

signatureandsidebar003-001-1

I’m joining the Metamorphosis Monday party at Between Naps on the Porch. Drop by and visit for tons of inspiration.

Sunday, October 7, 2012

My Annie Sloan Dining Table

In the early Spring of 2009 I just happened to see a television show on PBS with a wonderful furniture painter by the name of Annie Sloan! She was doing a demonstration of one of the projects from her latest book at the time. At the same time, we were in the process of building our summer cottage which you can read about here. My mother had given me her dining room furniture to use since it was in storage as she no longer used it. I decided that the Annie Sloan treatment would be the perfect match for it. All of this was before I even knew what a blog was, so I don’t have any before pictures!

painted dining table 1

The Queen Anne style dining set was purchased in the early 1970s, was made in the USA, and is solid cherry and in excellent condition.

painted dining table 2

After seeing the TV show, I immediately ordered the book from Amazon.

Annie SLoan book 1

The copyright date is 2008.

Annie Sloan book 2

The dining table project is on page 82.

Annie Sloan book 3

The book is loaded with great pictures and instructions.

Annie Sloan book 5

I was amazed that Annie said there was no need to sand or prep the wood first. I then started to look for the paint, only to find that it was not available in the US! When I went to order it from the UK, shipping for a small “pot” of paint was more than $85 bringing the total cost of one small can of paint to more than $100!!! Needless to say, I decided not to order it as I thought the risk was too great. So, I did it the hard way. I sanded the table and all 6 chairs! It really went rather quickly using my electric palm sander. Then I painted the base coat. I followed the instructions in the book. Annie suggested freehand drawing to give a more painterly look, so that’s what I did.

painted dining table 7

In addition to the band of silver leaf, I added a band of the wall color on either side of the silver.

painted dining table 16

painted dining table 17

The lines are not perfectly straight and I’m good with that.

painted dining chair 1

I added a little motif to the chair backs for interest. The inside of the motif has silver leaf too.

painted dining chair 2

painted dining chair 3

I used a weak wood stain instead of dark wax to give an aged look. I also added the stain to the silver leaf to tone it down a little. The unevenness of the stain is intentional to give a look of age over time.

painted dining table 19

I was pleased with the aged look.

painted dining table 12

painted dining table 13

I used the same technique on the wood and iron chandelier that I purchased on Ebay.

painted chandelier

While I had to put a lot of effort in to my “knock off” project, I am very pleased with the results! In case you live under a rock, Annie Sloan products are now readily available in the US and bloggers every where are singing the praises of her wonderful products. In this case, I guess you could say I was a few days early and a few dollars short!!

painted dining table 3

I’ll be linking to Metamorphosis Monday at Between Naps on the Porch; to Wow Us Wednesday at Savvy Southern Style; to Tips,Tidbits, and Tutorials at Stone Gable; and to the Open House Party at No Minimalist Here.Stop by each of the party links for loads of inspiration!

On a side note, some of you are aware that I have a small business, Lydia's House . com where I sell the Christmas dinnerware, Bethlehem Christmas, that I designed and had produced.

IMG_1718

You can see more of it in this post. I have just received word that our warehouse has been sold and we will need to relocate by the end of the month!!! So, I have reduced many items to 50% off in an effort to sell before having to move. These are the lowest prices ever and will only be for 2 weeks! So, now is a great time to make a purchase if you are interested. Click on the link above to go directly to the website.

signatureandsidebar003-001-1

Monday, September 24, 2012

Updated Heirloom Tool Caddy

After seeing all of the beautiful tool caddies in the blogosphere I had to get on the bandwagon.

tool caddy 1

Let me show you how it started out. While doing some cleaning in the garage, I ran across this, two of them, in fact.

IMG_1929

IMG_1932

Quite a work of art! My kids got little wood working kits with tools for Christmas one year and this was one of the projects that they completed. One of them even has a name written on the bottom that I won’t be painting over! I wish that they had dated them too. My kids are now 22 and 23 so these are more than 10 years old!  I added some little knob feet and small wood embellishments and painted away.

tool caddy 6

tool caddy 4

I use it to hold flatware when we are having guests at our summer cottage. Occasionally, I use it for seasonal décor.

tool caddy 5

I love being able to use this “family heirloom!”

I hope that you have a great first week of fall. I have a very busy next three weeks but hope to get some great photos to share with you!

I’ll be linking to Metamorphosis Monday at Between Naps On The Porch and to Wow Us Wednesday at Savvy Southern Style.

signatureandsidebar003-001-1

Wednesday, September 19, 2012

Buyers Beware---E Shopping Tips

I know that blog posts should have lots of pretty pictures to go along with good information but sometimes there are no photos that are fitting to essential info. Such is the case today. The purpose of this blog is to inform and inspire and I need to share my recent experience in hopes that others may be spared some trouble.

     Upon returning from our trip to China this summer, we were unable to find the charger for our camera. So, after several weeks, I decided that I would have to purchase a new one. I promptly went to the Canon website to look for a replacement. Much to my dismay, I found that the needed item was out of stock!

              camera battery charger

I then did a quick search for the charger and was delighted to find it at MelloDigital  .com. The price for the charger at Canon was $60 and at Mello it was $26.99 with shipping of $3.99, listed as brand new and in stock! How lucky for me to find it for almost half price! I quickly entered my credit card info and completed my purchase. I was willing to take a chance for a mere $30. This should have been red flag #1. If it sounds too good to be true, it probably is! In just a few short minutes, my phone rang. This should have been red flag #2. I was told that said item was on national backorder but that a better item could be sent out immediately, but it was $10 more. I told the person on the phone that I did not want the substitute because I was not willing to spend $39. He then told me that it included an additional battery but if I didn’t need another battery he could send the charger for $29. I told him that I would just look for my lost charger again. But, he insisted so I gave him the go ahead to send the $29 model. Fast forward 24 hours. My daughter was going through her things to pack for another trip and pulled out her camera and what should appear but the camera charger! It had gotten put away with her camera and charger. Knowing that my new charger was en route, I decided to wait for its arrival and return it. Fast forward 24 more hours. Said charger arrives as expected. I quickly emailed Mello Digital to ask how to return the item.  I received an immediate reply to call customer service at the given number. I called the number and was immediately put on hold. Red flag #3. I waited until someone finally answered. I explained my dilemma and was told that they did not accept returns!!! She told me to check the policy on the website. I was furious. Seeing that I was getting no where, I told the lady that I was not going to argue with her but that I would take up the matter with my credit card company and I promptly, firmly, and politely ended the call. I went to back the website to “check the policy.” The website says clearly that returns are accepted within 14 days of purchase. However, it goes on to list the items which are not allowed to be returned. Apparently the list includes every item they sell!!! Not to be outdone, I made a copy of my receipt and wrote across the bottom that I did not need said item, that I was returning it unopened in original packaging and that I would be filing a claim with American Express. I then took said package to the post office and mailed it to the return address and paid for delivery confirmation. Fast forward 48 hours. I promptly received an email that my returned item had been received and that the return process had been started. A few hours later, I received another email stating that my refund was being processed. I am happy to report that I received a refund including the $3.99 for shipping! Would I recommend doing business with this company? Absolutely not!! I should have done a quick Google search of the company name before making my purchase. There  were many, many negative reviews and no positive ones for the company. Apparently, their mode of operation is “bait and switch”. So, I learned my lesson the hard way. For those of you who do not know, most credit cards have some type of consumer protection. I use American Express and a Capital One MasterCard for as many purchases as I can in order to accrue travel reward points. I have found that both of these cards offer wonderful consumer protection. Every time I have filed a claim, it has been handled promptly and efficiently. As a small business owner, Lydia's House.com, I have found that credit card companies are on the side of the consumer. I once had a charge back to my business because the consumer reported the charge as fraudulent. She didn’t recognize the name of the business or the location. She had forgotten that she made a purchase from me at an out of town conference. I received a letter from the credit card company asking for documentation including a copy of the signed receipt. I promptly sent them the receipt and documentation. They did nothing! They closed the case and never gave me credit! I called the lady who had made the purchase,luckily I did have her phone number, and she apologized and asked me to run the charge through on her card again. It went through with no problem, no questions asked. That experience let me know that consumers have more rights than retailers! So, do not be misled by anyone telling you that returns are not acceptable. I have been told that any purchase made on a credit card must be able to be returned.

I hope that my negative experience can save someone from a similar headache!

I’ll be linking to Tips, Tidbits, and Tutorials at Stone Gable.

signatureandsidebar003-001-1


Tuesday, September 18, 2012

Summer Cottage Construction

summer cottage 1

One of my readers asked me to share some more info on our summer cottage. We built this cottage 4 summers ago, before I knew what a blog was, so the pictures have gaps in the sequence but I think you can get the idea. After much thought and prayer, we purchased a lot on a small lake 45 minutes from our home. My husband’s office and our church are located between our two houses so commute time is the same from either house, allowing us to spend a considerable amount of time in both locations without missing work or church. The lot we bought did not have a dwelling but had previously had a mobile home so it had a well, a septic tank, a deck, and a boat dock. That doesn’t sound like a lot, but it saved us more than $25,000 initially by not having to purchase or install those items immediately. The well and the dock have since been replaced but we did not have those expenses during initial construction. Since both of our children were in college at the time, we needed to be budget conscious. We hired a contractor to build a 1200 square foot cottage with a basement and we finished the basement ourselves after the contractor finished the main floor. Because the lot was only 50 feet wide and I wanted room for a driveway on one side, the cottage needed to be 30 feet wide by 40 feet deep. I searched high and low for a houseplan of those dimensions but to no avail. The contractor allowed me to design the house on graph paper and he built it from that. I had previously designed our main home and had an architect do the professional drawings but the contractor for this cottage did not think that was necessary. He told us that his bank would give us a loan based on the drawings that I had done. Believe it or not, they did! I’ll share more about the floor plan and interior in another post.

summer cottage 2

Here you can see the deck, sitting up on concrete blocks. It was suggested that we burn it! I insisted we keep it. It is a great size and was structurally sound.  I had it moved to the shade, lowered to the ground, covered the underpinning with bamboo fencing, and gave it a good pressure washing. It’s now good to go and we have enjoyed using it.

summer cottage 3 a

As soon as we closed on the property, construction began and was complete in 90 days. Grading began immediately and the concrete walls were poured for the basement.

summer cottage 3 b

The pipes sticking up are drainage pipes for the plumbing so that everything was ready to go when we finished the basement.

summer cottage 4

Framing of the basement walls went very quickly.

summer cottage 5

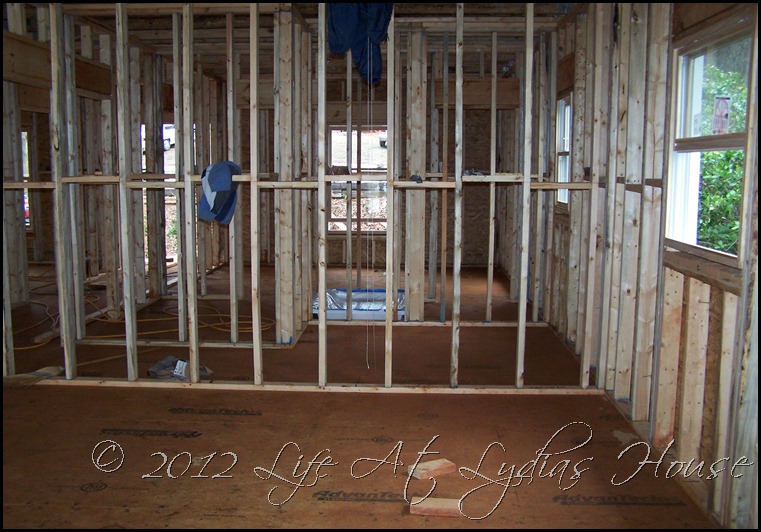
The framing crew then moved on to frame the upstairs.
summer cottage 6

summer cottage 7

summer cottage 8

Since we did not have detailed professional drawings, I thought that it was important to go to the sight every day to make sure that my vision was coming to fruition. I was there most days with my trusty tape measure in hand.

summer cottage 9

summer cottage 10

Soon it was ready for the siding to go on.

summer cottage 11

I chose a shingle style for the siding on the gable ends of the house to add some architectural interest.

summer cottage 12

Small details go a long way on a tiny house.

summer cottage 13

summer cottage 14

The painting crew was in and out in no time at all.

summer cottage 15

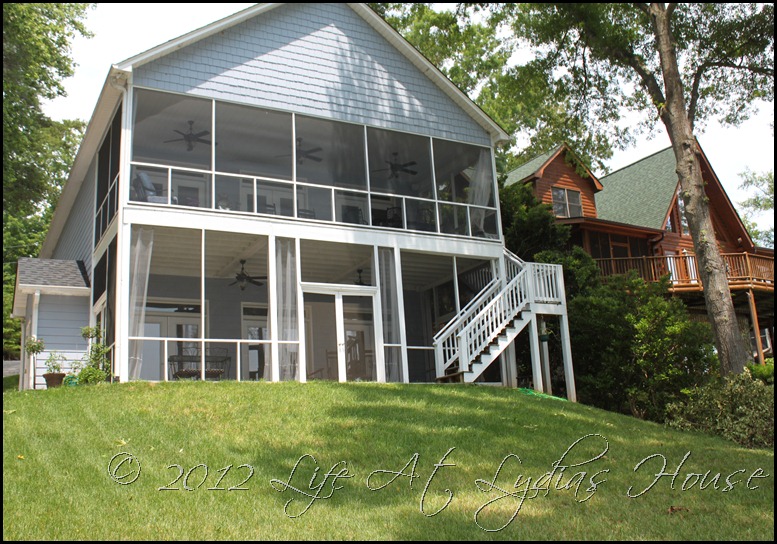
When I arrived one day, the screened porch had been completely framed. However, I did not like it. I thought that it was too closed in and all of the framing obstructed the view.  To me, it looked like a framed wall with no sheetrock. So, I had them go back and cut out every other post. Later, after the inspection, I removed the bottom rails to open up the view more. The rails must be there for code so that had to be done after the inspection. We do not have very small children in our family at this time. Should that ever change, adjustments will need to be made for safety.
summer cottage 16

Hopefully, you can see from here how the view is much more open now.

summer cottage 17

summer cottage 18

summer cottage 19

summer cottage 20

You can see from the photo above how steep the front yard was and from the photo below how steep the driveway was.

summer cottage 21

We took possession of the cottage on June 1 but the concrete crew could not get there until mid August so we had a muddy mess for the first summer!

summer cottage 22

A friend of my son suggested that we build a “bridge” for the front walkway to avoid steps. The concrete guy thought that it was a great idea.

summer cottage 23

summer cottage 24

We had to use cardboard for a walkway until the concrete was poured.

summer cottage 25

summer cottage 26

It is amazing what a big difference concrete, sod, and a few shrubs make!

summer cottage 27

I was able to find someone to do the custom iron railing for the walkway. Thankfully, I got two bids. The craftsman that I used gave me a bid that was one third of the previous bid I had received!  He too was able to work from my rough drawings.

summer cottage 28

summer cottage 29

summer cottage 30

The old deck doesn’t look too shabby in its new home!

summer cottage 31

summer cottage 32

summer cottage 33

summer cottage 34

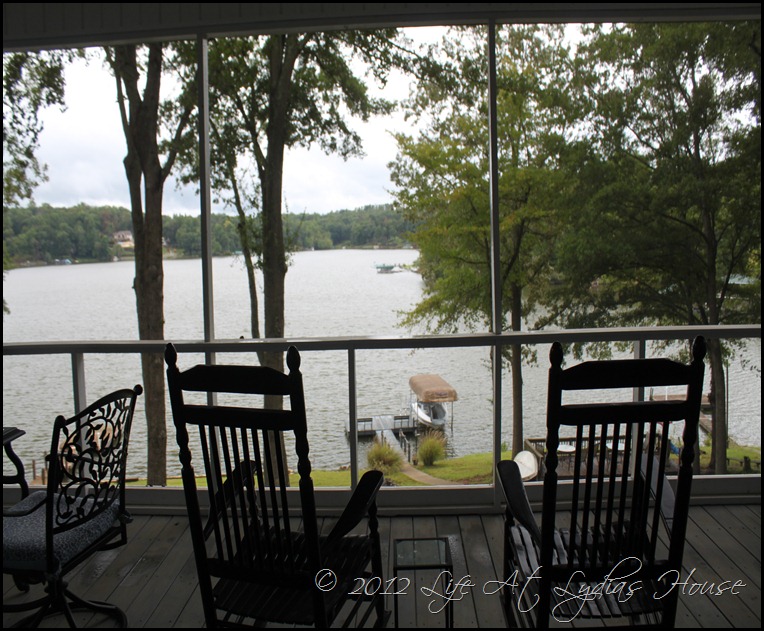
We enjoy taking a boat ride in the evening and watching the sun go down behind the mountains. Or sometimes, we just sit on the porch and enjoy the reflection of sunset on the lake.

summer cottage 36

This project involved a lot of work on our part and some financial discipline and sacrifice but has certainly been well worth it. I’ll be posting more on the interior and some of my hands on projects.

I’ll be linking to Wow Us Wednesday at Savvy Southern Style  and to Metamorphosis Monday at Between Naps On The Porch.

signatureandsidebar003-001-1