Monday, June 25, 2012

Slipcover for a Lampshade

You may have seen this lamp that I am using on my entry table at the summer cottage.
IMG_4452
It did not look like this when I purchased it. I found it in the clearance section at Hobby Lobby. It was a little wobbly. So I carefully removed the felt from the bottom and tightened the nut to correct the wobble. Then I stuck the felt back on. It was a  quick and east fix.
IMG_4432
While the shade was cute, it wasn’t really my style for this setting.
IMG_4430
So I purchased an inexpensive replacement at Garden Ridge.
IMG_4434
I liked the shape but I didn’t like the fabric so I decided to cover it. Because the shape was not conducive to just wrapping the fabric around and gluing it, I sewed a simple slip cover. I used some scraps of linen to cut a piece for each side then I pinned the pieces to the shade.
IMG_4440
In order to get a perfect fit, I did what the Chines tailors do, I hand stitched the side seams first. Then I removed the pins and stitched it on the sewing machine. The photo above is all wrong side out.
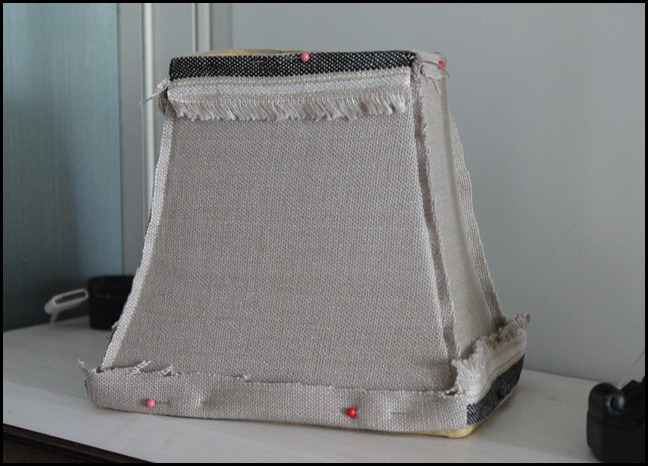
IMG_4443
After stitching the sides I tried in on for fit and trimmed the seams and pinned the edges before sewing them.
IMG_4446
The fit was perfect so I just had to flip it right side out and slip it on, no gluing required.
IMG_4449
I am very pleased with the results but I think I’m going to make another one using the silk fabric that I used for the leading edge on the drapes so that I’ll have a pop of color in this spot. Stay tuned for an update!
I hope that you are having a wonderful summer! Mine is VERY busy!
signatureandsidebar003-001-1
I’ll be linking to Metamorphosis Monday at Between Naps on the Porch and to Wow Us Wednesday at Savvy Southern Style and to Tips and Tutorials at Stonegable.

Wednesday, June 20, 2012

Refrigerator Pickles

One of our favorite summertime treats is refrigerator pickles. We do not have a vegetable garden, just a few tomato plants in pots. While driving down the road recently, I saw a young boy selling tomatoes and cucumbers from his mother’s garden. I decided to stop and make a purchase. I bought a few tomatoes and cucumbers and took them home. Just as I got inside the house, it occurred to me that I should have bought more. I hopped back in the car and drove back to where he was. He was beaming to see me return. I told him that I wanted more cucumbers. He called out to his mother in another language and she replied. He told me that his mom was going to get more. He told me that his mom is Russian. She brought more cucumbers and I asked him to thank her for me. He was so excited that I bought all that he had. My family was excited that I was making the pickles. Every one was blessed! The refrigerator pickle recipe is very simple.
IMG_4420
I purchase the small pickling cucumbers and wash them off before slicing them.  I put them in a jar with a snap seal lid.
IMG_4422
I use the microwave to make the syrup.
IMG_4423
I put 1 cup of white vinegar, 1 Tablespoon of salt, and 1 cup of sugar in a microwaveable bowl. I heat the vinegar until the sugar has dissolved. Then I allow this mixture to cool slightly before pouring in into the jar over the sliced cucumbers.
IMG_4424
Close the lid and store them in the refrigerator. Very simple and very delicious! Other variations of the recipe include onion slices, bell pepper slices, celery seed, etc.
I hope your family loves them as much as mine does!
signatureandsidebar003-001-1
I’ll be sharing at Tutorials, Tips and Tidbits at Stone Gable and to Metamorphosis Monday at Between Naps on the Porch.

Wednesday, June 13, 2012

My Favorite Spot to Relax

If you’ve visited this blog regularly, you’ve seen this spot before and probably won’t be surprised to find that my favorite spot to relax is on the screened porch of our summer cottage.
IMG_4495
I would much rather be outside than inside so I spend a lot of time here enjoying the view.
IMG_4491
When we built this home a few summers ago, a screened porch was an absolute must have. It was non-negotiable. The builder screened the top porch and we screened the bottom. We have found that the screen is a necessity due to mosquitos. The porches stretch across the whole width of the house, a whopping 30 feet and they are 12 feet in depth adding 360 square feet of outdoor room space to each level.
Most of my outdoor time is spent on the top level.
screened porch seating 1
The settee in the corner is great for taking a nap!
screened porch furniture
The server was a $20 roadside rescue. You can read about it here. I made the lamp on the end table from a lantern and a thrift store lamp and you can read about it here. I found the mirror over the server at an antique store. I love the old convex glass in it.
screened porch coffee table
The orchids thrive out here very well with little to no attention. The decorative box on the coffee table was purchased from Hobby Lobby ( with a 40% off coupon of course).
screened porch remote storage
The box provides storage for a pair of binoculars and for remotes for the fans and sound system.
screened porch upper rocking chairs
My favorite seat in the house may well be one of these rocking chairs. I believe that the key to comfort for these chairs is the contoured seat. I would not purchase a rocker without one.
screened porch upper dining 2
We enjoy many meals in the dining area at the other end of the porch. The sheer panels were purchased 3 summers ago from Ikea for $4.99 a pair! I love the way they blow in the breeze and soften the corners of the porch. Because the basement porch in just over 10 feet high, I had to cut 2 feet of material from extra panels and sew it on to make these panels come all the way to the floor. They remind me of the summer sheers that my grandmother had many years ago.
screened porch lower dining area
The dining area on the lower porch is used more for snacks than meals and for overflow when we are entertaining since it is farther from the kitchen and from the grill.
screened porch lower rocking chairs
Additional rocking chairs are on the lower porch. Both porches provide a wonderful place to relax.  After staying up all night at the hospital waiting for a special package to arrive, I have spent the day recovering here.
photo
My niece Hannah, the special package, arrived safely at just after 5 AM!!! I am proud to say that mommy and baby are both doing fine and she was worth every minute of the wait!
Praising God from whom all blessings flow!
signatureandsidebar003-001-1
I’ll be linking to Rhoda’s porch party at Southern Hospitality and to Wow Us Wednesday at Savvy Southern Style, to Metamorphosis Monday at Between Naps on the Porch and to the House Party at Thrifty Decor Chick.

Tuesday, June 5, 2012

Repurposed Piano Parts–Entry Table

One of my latest projects has involved the dismantling of my grandmother’s old upright piano. It involved a tremendous amount of work but it was great fun. I am in the process of recycling all of the parts. My first repurposed item was an entry table for our summer cottage.

table from piano parts

Due to limitations in the size of the lot, the layout of the house has a long, narrow hallway coming from the entry.

IMG_4426

The photo makes the hallway appear wider than it is. Actually it is only four feet wide, wall to wall so it would be less than that at the moldings on the floor. Thus, it is too narrow for even a shelf to be mounted on the wall.  I needed some type of small table to drop keys, phones, etc. on to keep it off the end of the kitchen counter.  At the end of the hallway, there is a niche next to the refrigerator that is 26 inches wide and 13 inches deep. After looking and looking for a piece to fit this spot, I finally decided that I could build my own. Take a look at what I started with………

IMG_4198

I didn’t take a lot of photos of the deconstruction but it was done over a period of two afternoons. Three large pieces came off very quickly and easily. The large panel on the bottom above the petals simply lifts off. The large panel at the top where the music rests comes off with a couple of screws. And, the very top which is a hinged panel comes off with a couple of screws. I will be repurposing these parts into a chest. After removing those three parts, we had to lay the piano down on its back so that it would not fall as we dismantled every thing else. I am NOT recommending that anyone try this. It is dangerous as these old pianos weigh several hundred pounds! The parts that I used for the table were the legs (which were held on with big screws) and the very bottom of the piano. I also used one of the curved pieces that folds down to cover the keyboard.

IMG_4435

The top of the table was made from the very bottom of the piano. It has a beveled edge on it. I stripped the varnish off of the curved piece and chose to leave it as natural wood because the finish was so pretty.

IMG_4438

My only purchase for this project was one piece of molding to cover seams on the sides of the table.

IMG_4439

There actually was a piece of molding in my salvaged parts but it was not wide enough to cover the area I wanted to cover.

IMG_4437

I built the drawer (box) out of a scrap of plywood and screwed the round front on from the inside. I even reused the wood screws from the piano! (I should have painted the drawer but was too anxious! I’ll do it later.)

IMG_4453

I purchased a buffet lamp from the clearance section at Hobby Lobby.

IMG_4454

Then I added a vintage box from my collection.IMG_4455

It is a wooden cigar box that I purchased at a flea market for $2!!! I almost died when the vendor said I could have it for $2! Another project checked off my list. Now, if I can re-train my family to drop keys here.

I hope you’re having a great and productive summer!

signatureandsidebar003-001-1

I’ll be linking to Wow us Wednesday at Savvy Southern Style and to Metamorphosis Monday at Between Naps on the Porch.

Thursday, May 24, 2012

Pretty in Pink

I recently hosted a baby shower for my niece who will soon have a baby girl. It was fun putting together a pink party.

IMG_4211

Instead of a traditional tablecloth, I used 4 yards of pink minky cloth and tied white bows to the corners. The fabric will be used later in the baby’s nursery.

IMG_4216

The centerpiece consisted of fresh flowers, mostly pink and white roses, with the umbrella hanging from the chandelier.I had to explain to some of my family members that the umbrella was for the “shower” and the crystals were “rain drops.”

IMG_4212

I fixed one of my niece’s favorite treats, peanut butter Ritz crackers dipped in candy coating. This time I used pink candy melts instead of the usual chocolate.

IMG_4213

I was able to find some little “it’s a girl” picks for the mini cupcakes. The pink icing was called Pink Lemonade.

IMG_4214

We had pink lemonade for our beverage.

IMG_4215

For the door decoration, I put a few small soft toys on a grapevine wreath and added some rosettes made from baby socks. I also added pacifiers to the ends of the tulle bow.

IMG_4228

My pink Knock Out tree roses did have a few blooms for additional color at the entry.

IMG_4230

We are ready to for the arrival of baby Hannah. We are praying for her health and for an easy delivery in a couple of weeks!

signatureandsidebar003-001-1

I will be linking to Tablescape Thursday at Between Naps on the Porch.

Monday, May 14, 2012

Updating and Re-Sizing Built-ins

I recently completed an update to the built-in shelves in our den.  It was quite an undertaking and made a tremendous difference in the appearance of the room.

IMG_4201

The lighter paint color made the room so much lighter and brighter.

IMG_2928IMG_4200

If you look closely at the after picture on the right, you can see that I also changed the trim work throughout the room from stained wood to white paint. In addition to the color change, I re-sized the built-ins.

IMG_2929 

These shelves house our television and we wanted to upgrade to a slightly larger TV. Unfortunately, the TV above was the largest size that would fit into the opening. I decided that a larger flat screen model would fit if the shelves were not so deep. They were more that 20 inches deep so there was room to trim them back.

IMG_2937

You get a better idea of the depth of the shelves when they are empty. I then began to carefully remove the molding from around the edges. Then I was able to find screws to remove. With a lot a gentle wiggling, the three top units came out.

den bookshelf 4

I carried the top units out to my workshop garage and got to work.

den bookshelf 1

With the unit on its side, I used a square and level to draw a line about 7 inches in from the back. I drew that line on both sides and the top. Then I got out the old circular saw and carefully cut along the lines!!

den bookshelf 2

Next, I carefully pried the thin plywood back off of the part that I cut off and put it on the freshly cut unit. The units were put back in place and I put the screws back in. Now I had a 7 inch gap around the edges to deal with. I used several pieces of molding to clean it up a little. I added a piece of crown molding across the top.

IMG_4204

I added another piece of molding at the front edge of the top wall and at the front edge of the walls on the sides.

IMG_4206

The molding makes a smooth transition and gives a more professional look.

IMG_4209

Now the larger TV can sit on the base and fit in front of the top unit without having to fit in the opening.

IMG_4201

These shelves are not particularly styled as they are more functional than decorative but I did pare down a lot of books. We don’t have any books just for looks so they don’t all have pretty white covers or we would never be able to find what we’re looking for!

IMG_4207

I have a collection of rabbits and several of my favorites are here.

IMG_4208

I’ve had this rabbit tureen for many years.

IMG_4199

We are enjoying the fresh look.

signatureandsidebar003-001-1

I’ll be linking to Metamorphosis Monday at Between Naps on the Porch and to Wow Us Wednesday at Savvy Southern Style.